Installation and Maintenance
PAST installation
PAST requires a concrete pad foundation for installation. Location is key. Choose a location that provides adequate maneuverability for your ARFF vehicles to operate in all training scenarios including roll-in operation for set up.
For an existing pad: the pad needs to be approximately 10 feet x 10 feet and 18 inches to 24 inches deep.
For a new pad: we recommend the PAST Foundation Anchor System (FAS) to secure the installation. It is a welded steel rebar assembly that has integrated anchor bolts and is placed into the pad while the concrete is curing. It is provided with purchase of the PAST 2.0.
Always consult a local engineer on the proper design and preparation of a foundation for PAST. They will assist with code requirements and determine the best construction based on soil and weather conditions.
For the complete installation guide, contact us.
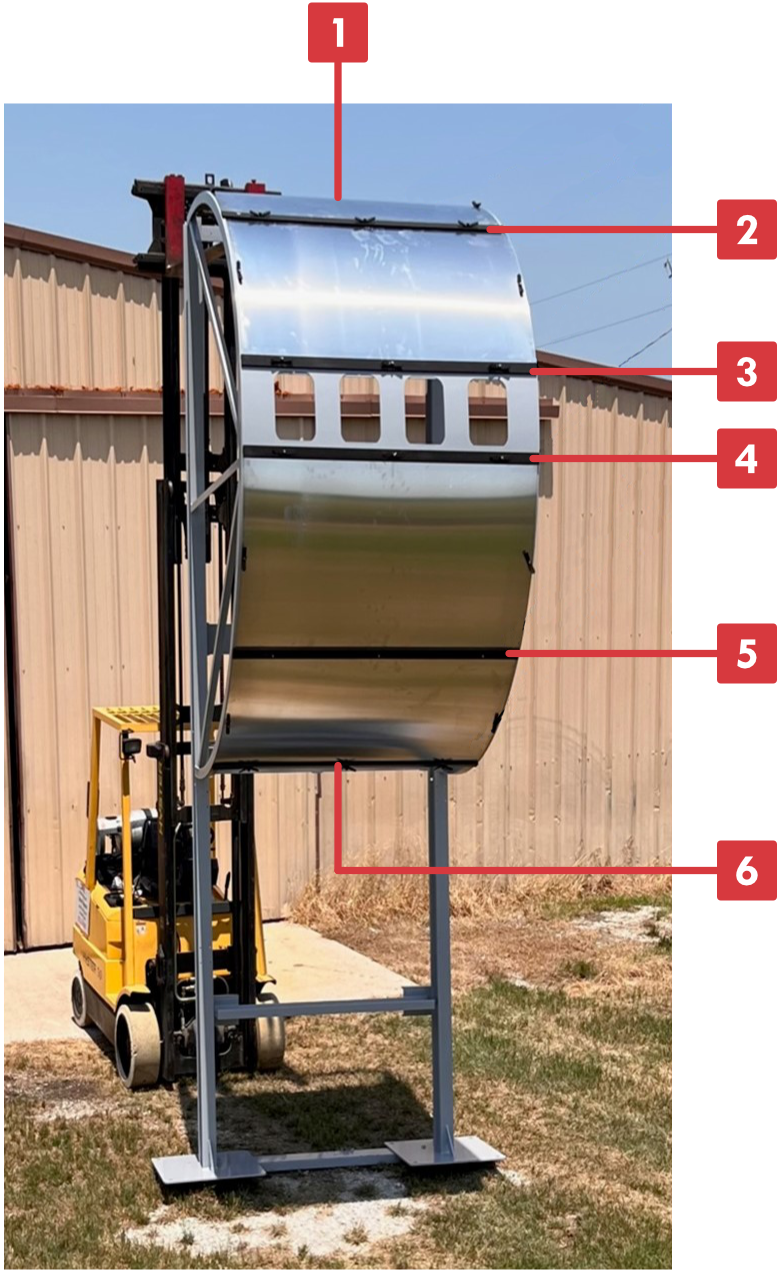
Panel replacement
There are four patented, aircraft-fuselage aluminum panels covering the arched penetration structure. When the panels are replaced, the old ones can be recycled at your local recycling center.
PAST 2.0 with the Elevating (ELV) assembly (and without the Wing Module) can be lowered to make contact with the base assembly. Otherwise, use a forklift and/or airstair to reach the panels.
CAUTION: Assign a safety person to oversee panel removal and installation. Always wear rip-resistant gloves, goggles, and full protection 2 clothing when removing panels. The penetration holes have created very sharp edges on the inside of the panel. Also, do not remove or install a panel under windy conditions. The wind could cause the panel to sail and possibly hurt someone or damage something.
At no time should anyone be positioned underneath the penetration grid during panel removal or installation.
After a panel is removed, be sure to dispose of it in a safe manner.
Aluminum penetration panel components
The panels are attached to the penetration grid by two steel retaining bars – each secured by three wing nuts – one retaining bar at the top and one at the bottom.
There are two integrated bolts midway down both sides of the panel structure that are also secured by wing nuts.
The windows (models after 2021) are held in place by two retaining bars that also hold the panels in place.
Removing the panels
Installing the panels
Note: The tightness of the panel is vital to emulate an aircraft fuselage, and to produce the realism the boom operator will feel when penetrating and removing the HRET spear.
The tightness will tend to maximize friction and drag, which will minimize panel deflection thereby protecting the panel, and more importantly, your HRET equipment.
OUR MISSION
Airport Professional Services is committed to providing HRET training tools and promoting the science of agent application efficiency
To accomplish this goal, our mission is to provide solutions that help train and prepare ARFF departments for all kinds of aircraft events with the intent of improving the overall outcome of any aircraft incident
© 2024 Airport Professional Services, LLC